Saturday, March 31, 2012

Easter Table Topper - Part 5

Note:  Anyone who left a comment and would like a file sent to them - please leave a way for me to find your email!  If you comment anonymously or even if you have your profile set so I can't see your email I can't contact you.  Please leave your email in the body of your comment in these cases.  As of 3:30 April 7th, I've sent out all files for people I have emails for so please comment again if you still don't have one. Thanks!  Amanda

Hi everyone,

Hope you are having a great weekend.  Here at the instructions to finish your Easter Table Topper...

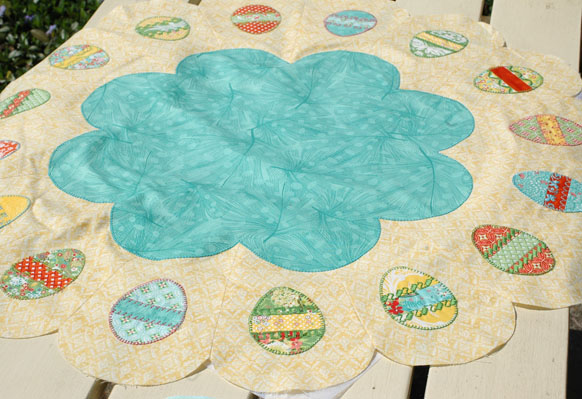
When we left off it was time to layer the Topper on top of the backing and batting and quilt it.  Just for a second, I'm going to skip ahead and show you some photos of the finished piece so that you can see the details of the quilting. 


I'm not the best quilter but I am working on my skills and the Bernina Stitch Regulator helps a lot!
You'll notice that I big arcs radianting from the center of the topper behidn the bunny and then filled in the arcs with concentric teardrop shapes.  This helps hide the seams where the Dresdens met and helped focus your eye on the center section as whole.

I also marked off arc areas around the eggs and filled them with stippling.  With all that motion I quilted some straight lines between these areas for contrast.


Okay, back to assembly...  Once you have your Easter Table Topper quilted, you are going to apply facing.  Take a large (at least 29'') square of fabric that is bigger than the size of your Topper and fold it in half both way, pressing lightly, to find the center.  This will be your facing.  Using that center mark, draw a big circle (mine was about 12-1/2'') in the center of the fabric square.  Staystitch on the circle line.  Cut out the center of the circle, using a 1/4'' seam allowance.  Clip the seam allowance right up to the stitching line at 1/4'' intervals.  Press the seam back along the line.  Use steam!  The better your pressing line, the easier it will be to finish.

Layer the facing on top of the Easter Table Topper right sides together, centering the design inside the cut out area.  Pin.


Turn the entire unit over and sew all the way around the piece, through all layers, using a 1/4'' seam allowance and your walking foot.


Trim off extra facing fabric.  Clip the 1/4'' seam allowance every 1/4'', right up to - but not through - the seamline.  Clip through all layers - including the batting!  You might have to clip a little extra at the internal corners where the scallops meet.


I'm clearly am not a free motion expert - note the overlapping stitching in the above photo, but you would be hard pressed to see that on the front side of the project.  Small projects are the perfect oppotunities to practice quilting - it doesn't have to be perfect!

Turn the facing to the back.  Press.  (If it doesn't turn well, you might have to turn it back inside out and clip the seam a few more times.)


Slipstitch the facing to the back of the Table Topper, all the way around your circle.  While doing so feel free to insert a label, if desired.


That's it.  Hope everyone has a happy Easter!

Amanda

Labels: , , ,

And the winner of the Blossoms Runner Top is...


#22, Karen, at Birdsong Cabin, who  said...


Beautiful table runner!!! I have been using the Frixion pins lately and have had good success with the lines disappearing when I hit them with an iron. Sometimes on a flower type shape I will cut the pattern from freezer paper, iron or pin it to my top and then quilt around the pattern (this idea came from the book Mary Mashuta - Foolproof Machine Quilting).

Thanks to all of your for the marking and quilting ideas!  They are great!

Happy sewing!
Amanda


Tuesday, March 27, 2012

Blossoms Table Runner at Sew We Quilt and a Giveaway

Tomorrow (well, really today) I'll be guest blogging at Sew We Quilt.  The wonderful Madame Samm is hosting a month of table runners and I will be sharing my Blossom Runner pattern, which is loosely based on my quilt pattern of the same name...


The runner was originally designed to use two stack of 40 (10'') squares (or a layer cake). I used lovely Ruby, by Bonnie and Camille for Moda.

So hop on over to Sew We Quilt and join the fun!

Then come back here and enter my giveway.  Did I mention that you only need 19 (10'') squares to make this runner, so with my layer cake I made two!  I'm giving away the other runner top.  Yes, you will have to quilt it yourself, but I have some neat quilting ideas posted over at Madame Samm's and it will be a really quick project!

While I was marking my runner for quilting, I encountered some really stubborn marks from my washable blue fabric pen.  They just didn't want to come out all the way.  I was eventually successful (got to love vinegar!) but it led me to wonder about other methods for marking a quilt.

So, to enter to win this giveaway leave a comment on this post telling me what method you prefer to use when marking a project.  If you prefer not to mark a project, tell me your favorite filling pattern.  No, you dont' have to have mastered it - it can just be a fun pattern you've seen.  (I'd love it if you would become a follower is you aren't already.)  Don't forget to leave me a way to contact you should you win.

The deadline to enter is Friday night and I'll post the winner on Saturday.  Also on Saturday, I'll be back with my final installment of my Easter Egg Table Topper.


Thanks again to Madame Samm for hosting her great blog. Happy sewing!
Amanda

Tuesday, March 20, 2012

An Easter Table Topper - Part 4

Are you ready to add the central flower-shaped motif to your Easter Table Topper? 

The flower will have Inner and Outer Petals and we will applique a big bunny in its center!  You'll need about 1/2 a yard of fabric each for the for the Inner and Outer Petals and a 6'' square of white fabric for the Bunny.

First, print out this Outer Flower Template 4 times and tape it together on the dashed lines.  Trace the big flower shape onto paper-backed fusible web.  (I used Steam-A-Seam-2 by the Warm Company.  If you only have some narrow fusible web you might have to trace it in two halves and that is okay.)  Cut out the excess fusible from the center of the shape (there will be a lot and you can use it for another project!) and fuse the remainder onto the wrong side of your Outer Petal fabric. 


My Outer Petal Fabric was a lovely feather design in a teal color from Flora, by Lauren and Jessi Jung for Moda.  (It looks lighter on the back.)  Cut out flower shape along the drawn lines. 


Remove paper and center on your Table Topper, using the seam lines as guides.  Fuse.  Back with one layer of stabilizer (I used Sulky Tear-Easy) and buttonhole stitch around the entire flower shape to secure.  (I used Aurifil 12 wt. cotton thread in 1148 teal.)  DO NOT tear off the stabilizer!


One note about applique stitch.  I like to use a buttonhole-style applique stitch with a 12, 24, or 30 weight contrasting thread in many of my applique projects.  (I use a 50 wt. cotton in the bobbin.)  My favorite is stitch #1329 on my Bernina.  I loosen the top thread tension considerably. 


I also really like the small (#20) open-toe foot for applique as I feel it gives me more control over the fabric than the traditional wider open-toe foot.  (I did, however, use the wider foot for the decorative stitches on the eggs to take advantage of the full 9mm stitch width.)


You have two options for the Inner Flower shape.  If you have an embroidery machine I have designed a hopping bunny embroidery pattern to stitch on each petal of the flower!  To do this, you will actually be stitching out more Dresden Plate blades using your embroidery machine, cutting them out, and assembling them as you did the egg pieces.  Eventually this design will make its way to the Bernina site, but in the meantime, feel free to post a message (not anonymously) with the type of file you need at the end of this post and I will email you an .EXP or other type of file.

To make the embroidered Inner Petals stitch out the bunny plates 8 times on your Inner Petal Fabric.  I used a pretty small scale light aqua dot print from Ruby by Bonnie and Camille for Moda.  Start at 1 end of the 1/2 yard cut and work your way down, rehooping for each plate.  This allows you to get the motifs pretty close together.  You can cut off embroidery pieces as you work your way down the fabric.  I used two layers of Sulky Tear-Easy and an array of threads I had on hand: Sulky 40 wt. rayon in 1001 white for the bunny and 1332 green for the grass, Madeira 1965 orange and 1683 yellow for two of the flowers, and Brother 079 Polyester for the third. 


Once you are done clip the threads and cut out your plates along the stitched lines. 


Sew together plates using a 1/4'' seam allowance, back stitching on both ends.  Press seams open.  Spray adhesive on the back and center on the Outer Flower Border shape.  (You can also pin or baste or use a fabric glue stick.) I originally designed this Inner Petal shape to be centered in the Outer Petal shape like this....


But once I was actually making the project I preferred the look that resulted when I offset the placement of the Inner and Outer Petals.


What do you all think?

Use a buttonhole stitch around the entire Inner Petal shape to secure.  (I used Aurifil 12 wt. cotton thread in 1114 green.)  Tear off stablizer and cut excess fabric from behind the Inner Petals, being careful not to clip the Inner Petals themselves!

If you don't have an embroidery machine you can still make the table topper! Use this template to print out the Inner Petal Shape.  Tape the shapes together along the dotted lines and trace onto paper-backed fusible web.  Cut out the excess fusible from the center of the shape and fuse the remainder onto the wrong side of your Inner petal fabric. Cut out. Remove paper and center on your table topper.  Fuse. Back with stabilizer and buttonhole stitch around flower to secure. 


Tear off stablizer and cut excess fabric from behind the Inner Petals, being careful not to clip the Inner Petals themselves.


Now it is time to add your bunny!  Trace this template onto paper-backed fusible web. If your are sewing the non-embroidered version you might want to enlarge the printout to 120%.  Cut out the excess fusible from the center of the shape and fuse the bunny shape onto the wrong side of your outer white bunny fabric. Cut out. Remove paper and center on your Table Topper.  Fuse. Back with stabilizer and buttonhole stitch around the entire Bunny to secure.  (Again, I used Aurifil 12 wt. cotton thread - this time in 2024 white.)  Tear off stablizer and cut excess fabric from behind the Bunny, being careful not to cut him!.


That is it!  If you just can't wait to get a start on finishing this topper the next step will be layering it on top of backing fabric and batting and quilting as desired.

Happy sewing!
Amanda

P.S.  For those of you who might have missed the first installments for this project, Part 1 can be found here, Part 2 can be found here, and Part 3 can be found here...


Friday, March 16, 2012

Available on newsstands now....

Quilter's Newsletter April/May 2012 Issue!


When people ask me my favorite project that I have made over this past year, I usually want to answer that it would be one of my Veranda quilts - most likely either the Under the Veranda Sampler or this Veranda table runner I did for Quilter's Newsletter. I haven't been able to show you all the table runner until now! It has a little hand-applique (of course, you could do fusible), a little piecing, a little fussy-cutting, and lots and lots of COLOR!
 
Since this is a small project I actually did the quilting myself.  Deborah is much better at this than I am, but I tried by best...


If you sew this in other fabrics please send photos!
Happy sewing!
Amanda

Monday, March 12, 2012

An Easter Table Topper - Part 3

Now it is time to decorate our eggs with fancy, much-neglected features on our machines!  (You can find Part 1 here, and Part 2 here.)

I chose to use 12 wt. heavy cotton thread and a top-stitching needle so the stitches would really show.  Use any (or all) colors that you have on hand that coordinate with your eggs.  I used 5006 (teal) and 1114 (green) by Aurifil and 1558 (rose) and 1332 (light green) by Sulky.  I used 50 wt. grey Aurifil cotton thread in the bobbin.  These worked really well with the Flora fabrics that I used, by Lauren and Jessi Jung.


Back the egg area of each Dresden Plate with tear-away stabilizer.  (I used Sulky Tear-Easy.)  Starting at a seam, bring both threads to the top of the fabric and run a buttonhole or applique stitch all the way around the egg.  (You might need to loosen the top thread's tension so that it doesn't pull the lighter weight bobbin thread to the front of the piece.) 

When you get back to where you started switch to a decorative stitch (adjusting thread tension again if necessary) and sew down the seamline.  You may want to adjust the scale of the stitch to fit the egg.  Now switch to a straight stitch and travel around the short distance along the side of the egg to the other seam.  Switch back to the decorative stitch and sew down that seam line.  Remove the Dresden Plate from the machine and clip the threads, leaving at least 3'' tails.  With a chenille sewing needle (or one with a big eye) take the threads to the back of the Plate and tie a knot close to the fabric.  Clip threads.

You can also do all the buttonhole stitching on all the eggs and then do the decorative stitching, but that leaves more threads to bury and who wants to do that?

Now, which decorative stitches are good choices?  Well, really any will work.  I saved the more detail ones for the eggs that have fabrics that read more as solids so that you can see their full effect.  I also adjusted the scale of some stitches and the thread tension on all.  Since I'm making two table toppers, I tried a lot of stitches!  No two eggs are alike. 

To save you time I took lots of pictures.  Note that the stitch numbers correspond to the stitches on my new baby - the Bernina 580e (yes, I drool every time I think about that machine!) but you might have similar stitches on your own machine.  Also, I took the pictures after I had joined the plates, but it is really much easier to applique the eggs and THEN join the plates, so resist that temptation until your decorative threadwork is done.


#431

#1332

#407
#416


#147

#19 - closed up
I forgot to adjust my bobbin tension - see the grey threads peeking through?
I love the delicate look anyway.

#111

#411

#427

#1332

#723

#709

#307

#473

#107 and #719 
This is a good example of a more complex stitch looking best on a solid...

#417


#429


#13

#905

#104

#401

#461

#450

#405

#437

#712 spaced out - really like this one...

#701

#136

#101
Another good example of a complex stitch on a solid.
Think about whether you want your stitches to run in the center
or outside of the contrasting band of fabrics.
The following eggs didn't make the final cut...

#422
Love the stitch, but would have preferred thread with more contrast


#426
EEEEK!  I forgot to adjust the scale of the stitch!

#309
I love the lacy look, but just didn't have somewhere to place this.

I had the brilliant idea to put lettering as a signature
across one egg, but I stitched it upside down so you
could only read it if you were standing in the middle
of the Table Topper.  Details...

#630
Wish I had burnt orange thread.

#904
When you have finished decorating your eggs, arrange 16 Dresden Plates together in a circle.  Join their long edges, using a 1/4'' seam. 


Next time we'll work on the center panel.

Happy sewing!
Amanda

Happy sewing!
Amanda

11 12 15 16 19 16 19 16 19 16 19 16 19 16 19 20 21 22 23

Amanda Murphy Design

24 25 26 30 26 30 26 30 26 30 26 30 26 30 31 32